Why Layering HTV Opens Up a World of Design Possibilities
One of the most powerful techniques in the heat transfer vinyl (HTV) world is layering — applying multiple colors or types of vinyl on top of or alongside each other to create complex, multi-color designs. While a single-color vinyl design is fast and simple, layering lets you create detailed graphics, gradients, and textures that would otherwise require an expensive multi-color print. With a little planning and the right technique, layering HTV is achievable even for beginners.
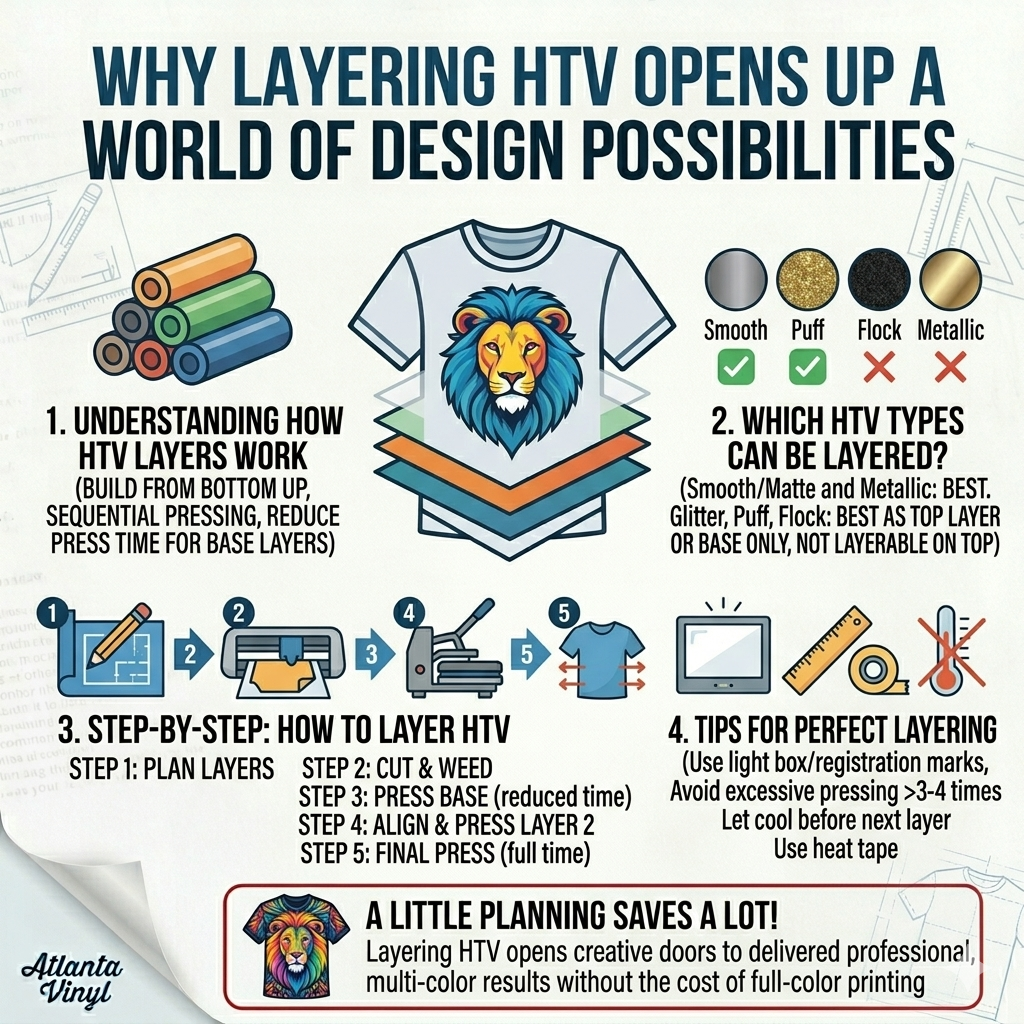
Understanding How HTV Layers Work
When you layer HTV, you're building a design from the bottom up — pressing each color in sequence, starting with the layer that sits lowest in the design and working your way to the top. The heat and adhesive of each new layer bonds to the layer below it, creating a single cohesive design.
The key rule: press base layers at reduced time or temperature to avoid fully curing the bottom layer, then do a final full press when all layers are in place. This prevents bottom layers from being damaged during subsequent presses.
Which HTV Types Can Be Layered?
Not all HTV is created equal when it comes to layering. Here's a general guide:
- Smooth/matte HTV (EasyWeed, Premium): Layers well. This is your best bet for clean layering.
- Glitter HTV: Can be layered on top of other vinyl, but do not layer other vinyl on top of glitter — the texture prevents adhesion.
- Puff/3D HTV: Best used as a top layer only. Pressing other vinyl on top will flatten the puff effect.
- Metallic HTV: Can be used as a base or top layer, but avoid pressing at very high temperatures, as metals can discolor.
- Flocked/Velvet HTV: Use as a base layer only — nothing layers well on top of flock.
Step-by-Step: How to Layer HTV
Step 1: Plan Your Layers
Before cutting anything, plan which color goes on which layer. Start with the largest or bottom-most color as Layer 1, then work up to the smallest detail or top color as the final layer. Sketch or use design software to map out the stacking order.
Step 2: Cut and Weed Each Layer
Cut each color separately from your vinyl cutter. Weed away the excess vinyl from each piece. If your layers overlap, make sure the area where one layer sits on top of another is cut cleanly — don't leave excess carrier film under the next layer.
Step 3: Press Layer 1 (Base Layer)
Press your first layer at the standard temperature but at 50–75% of the recommended time. For most HTV, this means pressing at 305°F for 5–8 seconds instead of the full 10–15 seconds. Allow it to cool, then peel the carrier sheet.
Step 4: Align and Press Layer 2
Carefully align your second layer over the first and press again — same temperature, same reduced time if more layers follow. Peel and check alignment before the vinyl cools completely.
Step 5: Final Press
Once all layers are in place, do a final full press (recommended time and temperature) to fully cure all layers together. This bonds everything into a single, durable design.
Tips for Perfect Layering
- Use a light box or window to backlight and help with precise alignment.
- Registration marks cut into each layer can help you align repeating shapes.
- Avoid pressing the same spot more than 3–4 times total, or you risk scorching the fabric.
- Let each layer cool completely before adding the next one.
- Use a heat-resistant tape to hold layers in position before pressing.
Layering HTV takes a bit of practice, but once you master the technique, it opens up a world of creative possibilities. From two-color school spirit designs to detailed mascot graphics, layered HTV lets you deliver professional, multi-color results without the cost of full-color printing. Atlanta Vinyl carries a full range of HTV types — from smooth to glitter to puff — so you have everything you need to start layering like a pro.